

Some time ago, I have written an post about Integration of TinyMCE editor in ASP.NET website. The same was also published in CodeProject and most visited article of mine. While answering comments there, I got a request from one of reader.
His question is, “I have used TinyMCE Rich TextBox in my application but in my web form i have mulitple mulitiline TextBox. what I want that Rich TextBox should be bind to only one text box not all TextBoxes.“
Situation
So the solution is here. Lets create a scene as below.

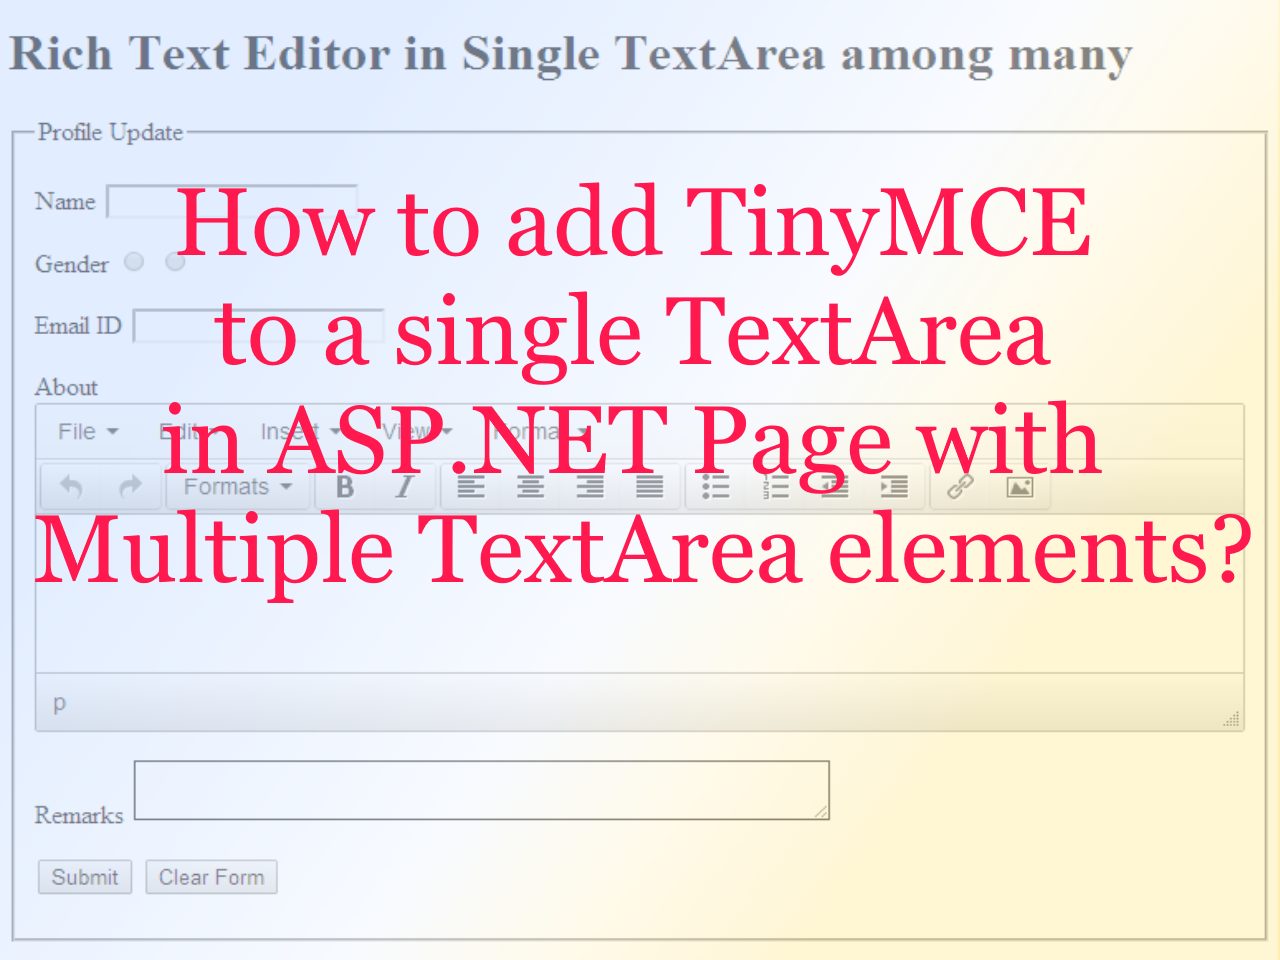
Here we have to convert TextArea for about to Rich Text Editor (WYSIWYG). Lets view source code of above design. I have tried to use simple HTML5 tags. So that other users can also get advantage of this tutorial.
<%@ Page Language="C#" AutoEventWireup="true" CodeFile="Default.aspx.cs" Inherits="_Default" %>
<!DOCTYPE html>

<html>
<head runat="server">
<title>Rich Text Editor in Single TextArea among many</title>
</head>
<body>
<form id="form1" runat="server">
<h1>Rich Text Editor in Single TextArea among many</h1>
<fieldset>
<legend>Profile Update</legend>
<p>
<label>Name</label>
<input type="text" id="txtName" runat="server" />
</p>
<p>
<label>Gender</label>
<input type="radio" name="Gender" id="radioMale" runat="server" value="Male" />
<input type="radio" name="Gender" id="radioFemale" runat="server" value="Female" />
</p>
<p>
<label>Email ID</label>
<input type="text" id="txtEmail" runat="server" />
</p>
<p>
<label>About</label>
<textarea rows="5" cols="50" id="txtAbout" class="Editor" runat="server"></textarea>
</p>
<p>
<label>Remarks</label>
<textarea rows="2" cols="50" id="txtremarks" runat="server"></textarea>
</p>
<p>
<asp:Button ID="btnSubmit" Text="Submit" runat="server" />
<input type="reset" value="Clear Form" runat="server" />
</p>
</fieldset>
</form>
</body>
</html>
Here we are using TinyMCE version 4.0.xx. This version is major upgrade and has completely different look and internal architecture compared to version 3.xx.
Solution – Add TinyMCE Editor in Single TextBox among multiple
So here is some difference in its integration. If you are not familiar with this process, please read our previous post, that will describe you about Copying required files in project directory and inserting script in more details. Insert below code before closing of head tag in your HTML page.
<head>
<script src="script/tinymce/tinymce.min.js" type="text/javascript"></script>
<script type="text/javascript">
tinymce.init({
selector: ".Editor",
theme: "modern",
plugins: ["lists link image charmap print preview hr anchor pagebreak"],
});
</script>
</head>
Explanation: Notable tags in code
Notable and new code in above integration script is selector tag. This is new included tag in TinyMCE version 4.0.xx. This gives us below options.
Do not forget to change the path to Script as per you folder structure.
- selector : “textarea” : This option will convert all TextAreas in visual editor.
- selector : “textarea.Editor” : This option will select all TextAreas with CSS Class Editor applied.
- selector : h1.Editor or div.Editor : This option will change this to Inline editor for H1 or DIV with CSS class name of Editor.
As you see in code of scene designed above. you can see that we have applied class Editor which we did not created in any css file to one of the TextArea. Here we used this method.
Code for TinyMCE 3.xx: Older Version
If you are working with TinyMCE version 3.xx, here is the code to be inserted in Head section of HTML page.
<script type="text/javascript"
src="script/tiny_mce/tiny_mce.js"></script>
<script type="text/javascript" language="javascript">
tinyMCE.init({
// General options
// mode: "textareas",
// Set mode to Exact.
//mode: "exact",
// Write the name of ID of TextArea where you want editor to appear in element property.
elements : "txtRemarks",
theme: "advanced",
plugins: "pagebreak,style,layer,table,save, advhr,advimage,advlink,emotions,iespell,inlinepopups",
});
</script>
Output
Now, the output of above work is below.

Its perfect. If you find this article helpful, drop a comment or share with your friend. To learn more about recent technology focused video content, please subscribe to our YouTube channel, PRB Hindi.
3 comments
it’s working for local but dont work on the server
now ı do. thank you so much
Good to know. Thanks for reading.